Posts

Showing posts from October, 2020

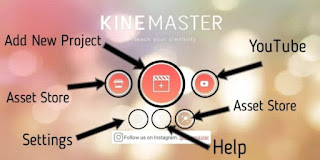
Front page layout of KineMaster
Image
  This large button in the center is to start a new project. The Left button is to buy elements that you can use in your video. The gear icon at the bottom left is for Settings. The middle button with a question mark is for help and support and the last button on the right is for the KineMaster Asset Store. The Asset Store has additional resources which can be downloaded to use in your videos. If you already have projects started, those will appear here too. To start a new KineMaster project, tap on the plus icon. Then choose the aspect ratio of the video. On iOS a new empty project will open immediately, while on Android we can choose to start with an empty project, or the Project Assistant Step 1:  On the right-hand side tap on the Media Wheel for adding media to your project. At the top tap Media to open the Media Browser where you can add images or videos...

How to Edit Video in KineMaster

Image
  The Playhead shows you what time you are at in the video. With a pinch-to-zoom motion, you can zoom in or zoom out on the timeline. Use play button to play through your video. Options Panel When you select a clip on the timeline, the option Panel will open. This panel contains options specific to that clip. For example, you can mute the audio on this clip. You can tap the speaker icon for audio options, then tap this little speaker above the audio slider to mute the audio. Press the left arrow next to the option title to go back to the Options Panel, or press the check mark if you are done with the Options Panel.

Action Bar Options in KineMaster

Image
  On the left side of your screen, you can see an Action Bar which lets you to undo, redo and share your video. Android At the top is an Undo button, and below that, a Redo button. The Share button gives you options to export and share your finished video. Settings The Settings button gives you options for the project you are working on. This Expand button allows you to see more of the timeline, which is handy when you have several layers in your project. Jump Button This Jump button moves the playhead to either the beginning or the end of the timeline. To use KineMaster’s jump button, tap on the last option of action bar. Action Bar Options When You Select a Clip on the Timeline The Action Bar also changes when a clip is selected. This first icon gives you options for capturing a still frame of the media on the timeline. The trash can deletes the selected clip. Menu gives you options for duplicating the clip. Ac...

How to Trim a Video in KineMaster?

Image
  One of the first things you will want to do with your clips is trim them to only show the best parts. There are a couple ways to do this. To use KineMaster’s video trimming option, just follow the below mentioned steps. I will select the clip on the timeline, and I can drag on the yellow handle at the beginning and end of the clip to adjust the in and out points. The other way to trim a clip is from the Options Panel. I will tap on the scissors icon, and as you can see, there are more options here for trimming and splitting the clip. The first option will trim off any part of the clip that is to the left of the playhead. The second option will trim off anything to the right of the playhead. Tap the third icon to split the clip into two parts. Extract Audio splits the audio from the video so that you can edit it separately on the timeline. Split and Insert Freeze Frame splits the clip at the playhead, and inserts that frame as a still image. You can reorder media on the timeline b...

How to Add Text to The Video

Image
  The first thing you can to do is scale up the layer by dragging from the corner. Then you can change the position of the text by dragging it up on the screen. Next, if you want to change the color of the text, tap on the for Color Picker. The Color Picker contains history of recently used colors, as well as a standard color palette. Tap the icon to use RGB sliders. The slider at the bottom of the picker changes the transparency of the text. The font options are sorted into different categories, and you can also find more options in the Asset Store by tapping here. Scrolling down in the Options Panel, you will see that there are more options for the text. A shadow has been enabled on this layer by default. The last thing I want to do with this text layer is add an In and Out Animation. You have to long-press and drag the clip forward. Then scrub towards the end of yoir clip, select your layer, and trim to the right. ...

How to Add Audio/Music in Video

Image
  Adding music in your video in KineMaster is very simple. So if you want to do add a music track to your video, follow these steps. Go back to the beginning of the timeline, and on the Media Wheel, tap Audio. This audio browser shows folders on your device that have audio files. The Music Assets folder at the top shows songs that you have downloaded from the KineMaster Asset Store. To get more tracks, you can tap the Asset Store icon in the corner of the screen. You can preview and download music tracks or sound effects. Select the track by pressing plus icon and then press the play button to preview the track. The track that you have selected, will appear on the timeline When you select the track, tap on the check mark button on the top right corner. You will also get the option to preview that audio file as well. Just tap the play icon. You have to tap the check mark to exit the audio brows...

How to Preview Audio/Music in Video

Image
  When you feel like you have finished all the editing process with your video, I recommend playing it back to make sure you did not miss anything. When you exit the editing panel a thumbnail of video will appear on the homepage of KineMaster, if you tap on the video the preview will look like this : The other options you have from this screen are to export your project, duplicate your project, or delete the project. Tap on the Export or Share button, and by doing this you can save the video in gallery, or upload to YouTube, Facebook, Google Plus, or Dropbox. The export process is similar on iOS. Tap the Export and Share icon, and in this case we will choose the video quality and frame rate next.

Export Project From KineMaster

Image
  Once the video is exported, you have the option to share it. So now you may have a pretty good idea of how to edit a videofrom start to finish in KineMaster and you may use KineMaster to edit professional quality of videos.